Introduction to Colab
Google Colab is an online platform to write computer code in what’s called a code “notebook”. Notebooks allow programmers to combine code output (like charts and text) with their notes and code in one place. Typically, programmers write code in files on their computers and then run those programs on their own computer, but that requires some setup that can make things complicated. Similar to a Google Doc, Colab allows you to edit code right in the browser.
To add text to your notebook, you’d be using a language called “markdown”. Markdown is a popular syntax used to add formatting to plain text like bolding a word or adding links. You don’t need to know too much about markdown, but it’s nice to know the basics if you’re interested. (This site was built using just markdown!)
Executing your first code block
- Go to the Colab website, you should be greeted with an introductory notebook. (This intro notebook has some pretty complicated stuff, so don’t get too worried about everything that’s written there.)
- Edit any code block and click the “play” button on the left side. A useful shortcut to remember is Shift + Enter. This will execute whatever code block you’re currently editing.
- Create a new notebook.
File > New Notebook - In the upper left-hand corner, rename the notebook to “first-notebook.ipynb”
- Copy the following code into a cell, and execute the cell:
print('Welcome to Colab!')
Example notebook
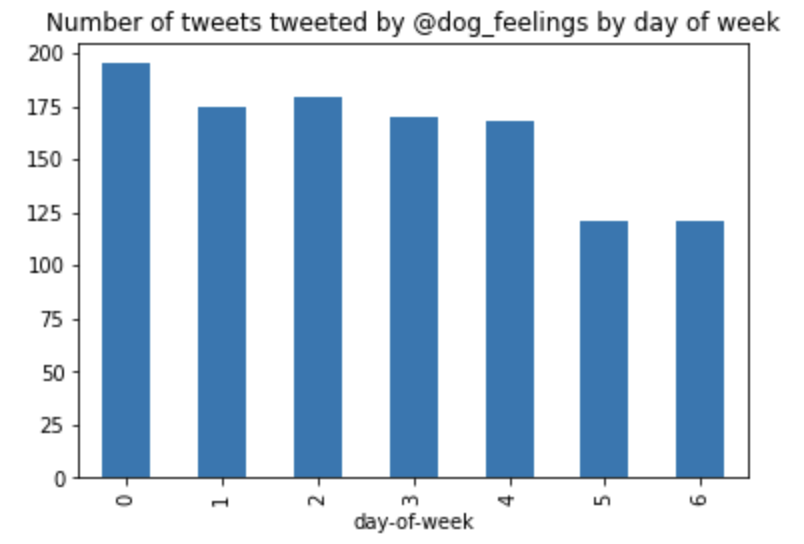
Let’s say we are interested in the Twitter account @dog_feelings, and we want to know what day of the week the account tweets most frequently. I already have a CSV of the account’s tweets prepared (link).
Create a markdown cell with the heading “Analyze Twitter account @dog_feelings”. To add a text cell, look for the + Text button at the top of your notebook. This is what that would look like in markdown:
# Analyze Twitter account [@dog_feelings](https://twitter.com/dog_feelings/)
Create a new code block (+ Code button), copy the following code block, and execute it. By the end of these two seminars, you should understand what this code does!
# Research question: What is the most popular day of week for @dog_feelings to tweet?

# import a library that helps us parse CSV files
import pandas as pd

# Read the CSV from the provided link and place into the variable `df` (short for dataframe)
df = pd.read_csv('https://raw.githubusercontent.com/kmcelwee/fsi-web-scraping-seminar/main/data/dog_feelings-tweets.csv')

# We want to work with time data, but it takes an extra step to make sure that
#  the dataframe parsed the timestamp correctly. Here we use the to_datetime
#  function to turn the `string` into a `datetime` object, a common object in
#  python that allows us to easily get the day of the week.
df['timestamp'] = pd.to_datetime(df['timestamp'])
# Create a new column `day-of-the-week` using the timestamp column
df['day-of-week'] = df['timestamp'].dt.dayofweek

# Group by day of the week and plot the count as a bar chart, and give a title!
df.groupby('day-of-week')['id'].count().plot(kind='bar', title='Number of tweets tweeted by @dog_feelings by day of week.')

# Note: 0 is Monday and 6 is Sunday
Again, you don’t understand every component here, but the benefit of Colab is that you can combine your notes, charts, and code all in one place.
📈 Exercises:
- Given the chart created by the code above, what is the answer to our research question?
- What are some questions that come up from this chart? How might it be improved?
- The header of the CSV is
timestamp,id,text,favorite_count,retweet_count,hashtags. What other questions could we answer using this data?
Other helpful hints
-
It’s easy to execute cells out of order. When you go back to your notebook it’s possible errors might pop up if you execute them one after another. The number in brackets to the left of your code is the order of cell execution. If you have two code cells and one relies on the other, then you’ll need to execute the first cell before executing the second.
- By hovering over many of the buttons, you’ll see keyboard shortcuts that are useful to remember and will save you a bit of time. Here are some worth remembering:
- Shift + Enter: Execute the code in this cell
- Command / Ctrl + M + B: Create a cell below this cell
- Command / Ctrl + M + A: Create a cell above this cell
- Command / Ctrl + M + D: Delete this cell
- Command / Ctrl + M + Z: Undo
-
Don’t forget to turn on “Corgi Mode”
- Check out how jupyter notebooks are used in Nobel prize winning scientific research